Upload images using uploadthing

Search for a command to run...
No comments yet. Be the first to comment.
Bun, the hyper-fast JavaScript runtime known for its incredible speed and Zig-based architecture, is being completely rewritten in Rust. For a project that has over 22 million monthly downloads and ea

Next.js 16.3 is almost here, and it's packed with a ton of improvements and let's see them in this post 1.Instant Navigation For a while now, there’s been a valid, lingering debateServer Components vs

It’s official. React has merged its long-awaited Rust port of the React Compiler (formerly known as React Forget) into the main repository. What started as an experimental research project by Joseph S

If you follow modern technology trends, you have likely been led to believe that artificial intelligence is entirely built on Python. Every tutorial, machine learning framework documentation, and open

Just when the JavaScript ecosystem was catching its breath after last week’s TanStack Router compromise, the Mini Shai-Hulud supply chain worm has continued its relentless march. Developed by the thre

Hey There 👋. Today we will see how to upload files to Uploadthing in Next.js
Uploadthing is a full stack Typescript application where you can upload your files. They mainly focus on the three things like
File Hosting (Similar like S3, but in simpler way)
Server side Authorization (Authorize users on your server)
Client Experience(Provides an Open source React client library for uploading files from Front end)
For this experiment i am going to use Next.js application. Create a new Next.js project using the following command
npx create-next-app@latest upload-thing --typescript --tailwind --eslint
Before the setup gets completed lets create a new account in uploadthing
Go to uploadthing and then signup with your Github account and then create a new application like below

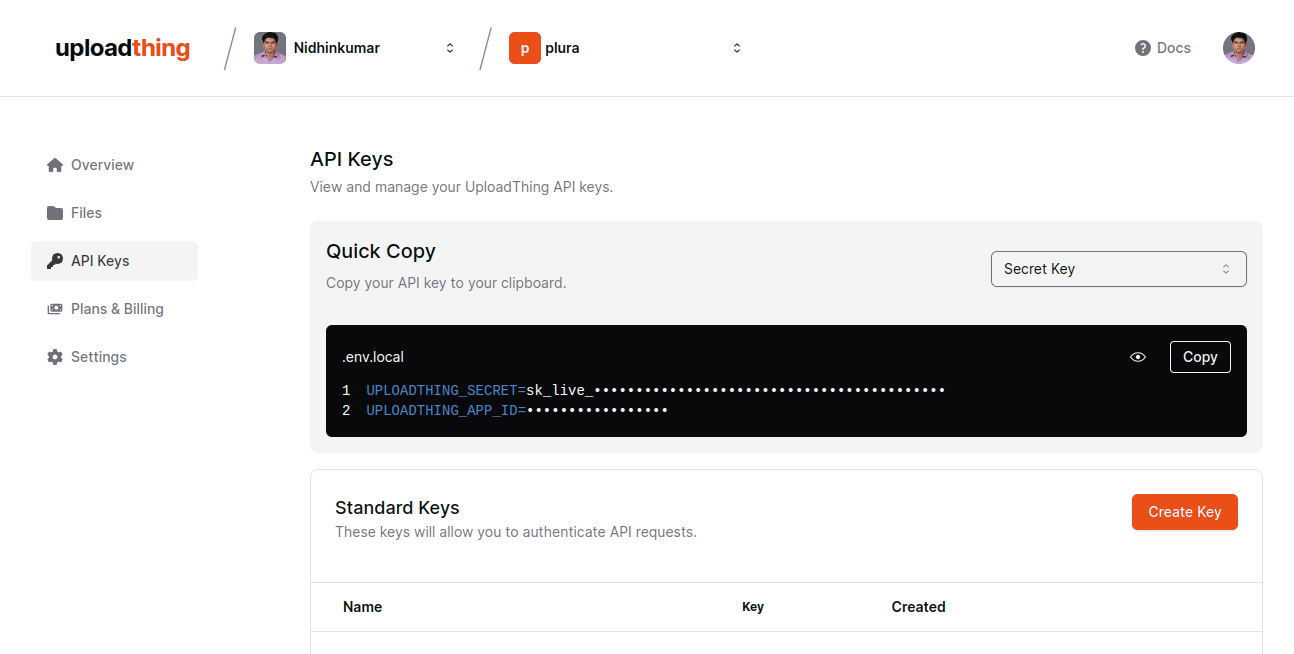
Once the application is created click on it which will show you certain options. In that click "API Key" and copy the credentials
Now headover to the Next.js application and then create a new file in the root named as .env.local and then paste the API keys that you have copied
Now install the client dependencies
npm install uploadthing @uploadthing/react
Inside your src directory create a new directory like app/api/uploadthing and now create a new file named as core.ts and then copy the below code and paste it in the core.ts file.
import { createUploadthing, type FileRouter } from "uploadthing/next";
import { UploadThingError } from "uploadthing/server";

const f = createUploadthing();

const auth = (req: Request) => ({ id: "user1" }); // Fake auth function

// FileRouter for your app, can contain multiple FileRoutes
export const ourFileRouter = {
  // Define as many FileRoutes as you like, each with a unique routeSlug
  imageUploader: f({ image: { maxFileSize: "4MB" } })
    // Set permissions and file types for this FileRoute
    .middleware(async ({ req }) => {
      // This code runs on your server before upload
      const user = await auth(req);

      // If you throw, the user will not be able to upload
      if (!user) throw new UploadThingError("Unauthorized");

      // Whatever is returned here is accessible in onUploadComplete as `metadata`
      return { userId: user.id };
    })
    .onUploadComplete(async ({ metadata, file }) => {
      // This code RUNS ON YOUR SERVER after upload
      console.log("Upload complete for userId:", metadata.userId);

      console.log("file url", file.url);

      // !!! Whatever is returned here is sent to the clientside `onClientUploadComplete` callback
      return { uploadedBy: metadata.userId };
    }),
} satisfies FileRouter;

export type OurFileRouter = typeof ourFileRouter;
In the above code you can see that there is an auth where you can pass the user id for now it is kept as user1 and you can see the file max limit as well as callback function once the upload is completed sucessfully.
Now create another route file named route.ts in the uploadthing directory itself and add the below code
import { createRouteHandler } from "uploadthing/next";

import { ourFileRouter } from "./core";

// Export routes for Next App Router
export const { GET, POST } = createRouteHandler({
  router: ourFileRouter,
  config: { ... },
});
Now we will add the UploadThing styles to our code headover to tailwind.config.ts and add the below styles code
import { withUt } from "uploadthing/tw";

export default withUt({
  // Your existing Tailwind config
  content: ["./src/**/*.{ts,tsx,mdx}"],
  ...
});
As well as in tailwind.config.js
/** @type {import('tailwindcss').Config} */
const { withUt } = require("uploadthing/tw");

module.exports = withUt({
 //...tailwind contents
});
Now we will create the uploadthing component. Create a utils directory and then create a new file named uploadthing.ts and add the below code
import {
  generateUploadButton,
  generateUploadDropzone,
} from "@uploadthing/react";

import type { OurFileRouter } from "~/app/api/uploadthing/core";

export const UploadButton = generateUploadButton<OurFileRouter>();
export const UploadDropzone = generateUploadDropzone<OurFileRouter>();
Now we will use this button in our component go to your page.tsx file and clear the default contents provided by Next.js and then add the following code
"use client";

import { UploadButton } from "~/utils/uploadthing";

export default function Home() {
  return (
    <main className="flex min-h-screen flex-col items-center justify-between p-24">
      <UploadButton
        endpoint="imageUploader"
        onClientUploadComplete={(res) => {
          // Do something with the response
          console.log("Files: ", res);
          alert("Upload Completed");
        }}
        onUploadError={(error: Error) => {
          // Do something with the error.
          alert(`ERROR! ${error.message}`);
        }}
      />
    </main>
  );
}
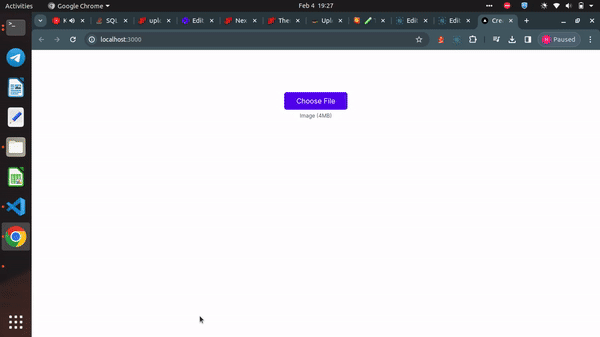
In the above code we are using the uploadthing upload button where we can upload an image and you could see the output like below
Now we will see how we can use the Uploadthing Dropzone component
Use the below code to add the Dropzone instead of normal upload component
<UploadDropzone
      endpoint="imageUploader"
      onClientUploadComplete={(res: any) => {
        // Do something with the response
        console.log("Files: ", res);
        alert("Upload Completed");
      }}
      onUploadError={(error: Error) => {
        // Do something with the error.
        alert(`ERROR! ${error.message}`);
      }}
    />
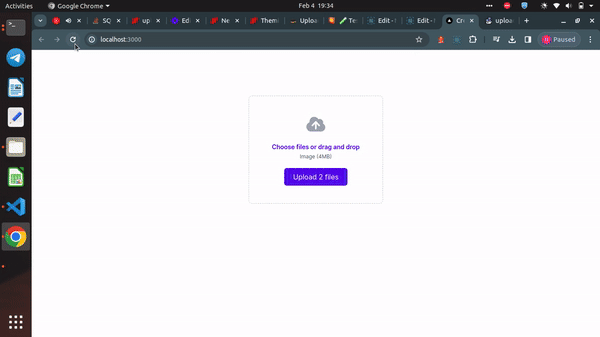
You can see the dropzone like below
You can change the styles for the upload components by visting the themes pages where you can change the color, icons etc.
You have learned how to upload images using uploadthing without creating complex components. Will catch up on a new post till then Happy Learning !!!